Sunday, January 16, 2011

XNA Game Development Tips and Tricks 6: 2D Collision Detection make easy for player

We will see how we can do the collision detection and how we can make it a bit easier for the player. Collision detection is one of the most discussed part of game development. Now lets say we have two sprites moving in our game and we want to detect whenever they collide with each other.

What we have here is Sprite’s X and Y Coordinates and its Width and Height. So we will be taking both sprite’s X and Y coordinates and Width and Height and figure out whether both intersects with each other or not. Let’s take a look at the following code:

public bool CheckCollision(Rectangle sourceRect, Rectangle destRect)
{
      return sourceRect.Intersects(destRect);
}

Above code does a perfect collision detection, but there is a little problem with player. We should be giving a little freedom to player so that game does not become very difficult for player. In order to do that we are going to Inflate the Sprite.. dont worry this inflation is only logical and will not be displayed to user.

public bool CheckCollision(Rectangle sourceRect, Rectangle destRect)

      sourceRect.Inflate(5, 5);
      return sourceRect.Intersects(destRect);
}

By Inflating we are inflating one of the Sprite by 5x5. We can Inflate both Sprites as well. Depending on how easy you would want game to be you can decide how much sprite you would like to Inflate.

Sunday, January 9, 2011

XNA Game Development Tips and Tricks 5: Animate 2D Sprites

Animation is very important part of game development, if your game does not have any kind of animation it will look very dull.

While doing animation we have to consider many aspects of the game:

  1. Animation should not be Slower
  2. Animation should be not be Faster
  3. Animation should be Smoother
  4. Animation should load Faster

We will be using following image for the animation:

256x32

If you look at above image, it is single image and not 8 tanks. Reason why we are not having 8 different images and loading them in the game is because it will take more time compared to having single long image loaded. If you have just one single sprite in your game for animation it will not make any difference, but if you have many sprites to be animated you will see significant performance difference. So let us see how we can animate the sprite and how we can control frame rates for the sprite.

First we will declare all required variables to be use.

private int FrameCount = 8; //number of frames in image
private int CurrentFrame = 0; //current frame to display
private float FrameLength = 0.12f; //Frame length per frame.. calculated 1/8 i.e. one second divided by number of frames (8)
private float FrameTimer = 0.0f; //Keep note of time

Now let’s load the content in memory, and add image to the Content project.

mSpriteTexture = Content.Load<Texture2D>(“bluetank”);

now, lets write Update code, which will update the current frame number which we would want to show to the user. Code which we have written in Update method will render 8 Frames in a second.

public void Update(GameTime gameTime)
        {
            FrameTimer += (float)gameTime.ElapsedGameTime.TotalSeconds; //Find out the CurrentTimer and based on this we will calculate which Frame to render.

            if (FrameTimer > FrameLength)
            {
                FrameTimer = 0.0f; //Reset FrameTimer to 0
                CurrentFrame = (CurrentFrame + 1) % FrameCount;  //Set CurrentFrame
            }
        }

Finally draw the sprite on the screen with the updated Frame.

theSpriteBatch.Draw(mSpriteTexture, Position, new Rectangle(CurrentFrame * 26, 0, 26, mSpriteTexture.Height), Color.White);

Once you write above code, build it, run it and you should be able to see Your Sprite Animating.

Saturday, January 1, 2011

XNA Game Development Tips and Tricks 4: Forcing and Calculating Frame Rates

Happy New Year 2011 to everyone.

We are going to see how we can control Frame Rates and how we can calculate current Frame rate at which game is getting rendered.

Frame rates are very very important part of game, actually speaking frame rats are important in every aspect of not just games but also in life.

Frame rates in video games means rate at which images are being rendered on the screen known as FPS (Frames Per Second). If you do not set correct FPS for game,  gamers will have weird experiences. For example lower Frames Per Second (FPS) will not give them illusion of motion and it will affect the user’s interaction with the game. Today games lock their frame rates to give a steady performance. If you have slower device game frame rates will drop and if you have very high end device game frame rates will increase and may give bad experience to players. Locking Frame Rates will make sure Frame Rates does not go beyond particular point, but we will not be able to control Low Frame Rates much because Low Frame Rates are very much dependent on the resources available.

Link will give you good examples at Frame Rate Samples : http://spng.se/frame-rate-test/

Windows Phone 7 forces 30 FPS, so whenever you create game for Windows Phone 7, you will see one line of code:

TargetElapsedTime = TimeSpan.FromTicks(333333);

if you increase Ticks from 333333 to 666666 you will notice decrease in Frame Rates, and if you decrease Ticks from 333333 to 111111 you will notice increase in Frame Rates. On Windows Phone 7 you will not get higher frame rates, because Windows Phone 7 OS forces 30 FPS, but on Console or PC you will see increase in Frames if your device is capable of doing so.

Now let us look at how we can calculate frames. Write following code in Class declaration.

float CumulativeFrameTime;
int NumFrames;
int FramesPerSecond;
SpriteFont msgFont;

Write following code in LoadContent method.

msgFont = Content.Load<SpriteFont>("score");

Write following code in Draw method.

CumulativeFrameTime += (float)gameTime.ElapsedGameTime.TotalMilliseconds / 1000f;
NumFrames++;
if (CumulativeFrameTime >= 1f)
{
    FramesPerSecond = NumFrames;
    NumFrames = 0;
    CumulativeFrameTime -= 1f;
}
spriteBatch.DrawString(msgFont, "FPS: " + FramesPerSecond.ToString(), new Vector2(0, 0), Color.Black);

Above code will calculate FPS and display it on the screen, it is very useful when you are developing game to see, at what point of time your game is dropping FPS and how you can improve on that and many other things.

Wednesday, December 29, 2010

XNA Game Development Tips and Tricks 3: Windows Phone 7 Playing Music and Sound FX

You are developing a game, and your game is pretty decent but game without sound and music is not good game and does not create excitement that it needs to. For example Xbox 360 has Achievement earning, when you earn achievement sound of achievement earning is so nice to ears that you would love to play game just for the sake of earning achievements. Anyways that's apart coming back to todays tips and tricks. We are going to see how you can play Sound and Music in game using Windows Phone 7, what are challenges, tips and tricks.

XNA provides two ways of playing sound/music:

1 – SoundEffect
2 – Song using MediaPlayer

When you want to play small sounds, like explosion of bomb or sound of coin dropping on floor or similar sound effects you would want to use SoundEffect class. and when you want to play Background Music you would want to use Song class. Difference is that SoundEffect only plays WAV files, so when you use Music as WAV file, your music would be at-least 1 minute long, and 1 minute for WAV file is huge, your wav file will be very large approximate 20-30 MB.

Song class has another issue that at a time we can play only one file, we can not play more than 1 file simultaneously. So if you want to play Human voice, you might want to make them as WAV file and play them using SoundEffect class.

Have a look at following code:

SoundEffect sfx = Content.Load<SoundEffect>(“coinsound”);
sfx.CreateInstance().Play();

Above code will load content which is “coinsound” in wav file format, we create it’s instance and then play. Now you must be wondering why to call CreateInstance? when we are already initializing object. Now take a case when you collect coin you want to play sound so you execute above code, now above code works fine, but what if we collect multiple coins at same time then what to do in that case? In that case above code will produce sound of coin only once, even if you execute Play method multiple times, and will not give kind of effect we are looking for. So to produce multiple sound effect of same sound file, we can use same object but every time we will have to call CreateInstance and then call Play method.

Now, for playing Music we write below code:

Song sng = Content.Load<Song>(“backmusic”);
MediaPlayer.Play(sng);
MediaPlayer.IsRepeating = true;

Notice we are using MediaPlayer class for playing music, it means it will be using Zune Player to play the music. Now when you write above code and run your application you will come across given below error:

“Song playback failed. Please verify that the song is not DRM protected. DRM protected songs are not supported for creator games.”

image

This happens because your Windows Phone’s Zune Library is locked by Zune Software on PC.. Currently possible way of doing is to first run your game through Visual Studio on Device, when you encounter above error, stop debugging, disconnect device from PC and then start game on device through applications, and now you should be able to hear Music. NOTE: When you do SoundEffect you will not have any problem as above, It is only with MediaPlayer.

Sunday, December 26, 2010

XNA Game Development Tips and Tricks 2: Windows Phone 7 Full Screen Game

Whenever you develop a game for Windows Phone 7 using XNA game does not start in Full Screen mode, meaning when game starts it does not occupy the entire screen instead it leaves some space on top if running in Portrait mode or leaves some space on left side if running in Landscape mode.

image    image

This happens because Windows Phone Operating System makes top space or left space available for the battery meter indicator, time, cell signal, wifi signal, etc… now this can make your game look really bad and you will not be able to utilize the entire screen. So what to do if you want to occupy entire screen? Well, very simple you just have to write one single line of code, look at below code snippet:

public Game1()
{
    graphics = new GraphicsDeviceManager(this);
    graphics.IsFullScreen = true;
    Content.RootDirectory = "Content"; 
    TargetElapsedTime = TimeSpan.FromTicks(333333);
}

Writing above code will hide the bar which occupied the space. But this does not mean your game will block calls, notifications, etc.. whenever any kind of notification or call arrives Windows Phone Operating System will alert your game saying User is not able to see screen so that you can pause the game. This happens only when you receive a call or notification which would take up a space of screen.

For the partial-screen Obscured notification and the tombstoning notification to the Game.Deactivated event will be fired. PhoneApplicationService.Deactivated event will fires for both Silverlight and XNA when the app is being tombstoned. Obscured and Unobscured are not binded in App.xaml.cs file is because there will be many non-game applications which will not need to use these events.

Once you done with the above code, compile and run the code and notice the difference.

image    image

Saturday, December 25, 2010

XNA Game Development Tips and Tricks 1: Windows Phone 7 Portrait Mode

Hello, with this blog post I am starting tips and tricks on Developing Games on Windows Phone 7 using XNA.. or in general XNA.

By default whenever you develop game for Windows Phone 7 using XNA, your game will always start in Landscape mode. Your emulator will start in portrait mode, but game is playable in landscape mode.

image

Let’s say you have requirement of developing game for portrait mode and not landscape mode, you have to add 2 lines of code. In your game after you initialize GraphicsDeviceManager write following 2 lines:


public Game1()
{
    graphics = new GraphicsDeviceManager(this);
    Content.RootDirectory = "Content";
    graphics.PreferredBackBufferWidth = 480;
    graphics.PreferredBackBufferHeight = 800;

    TargetElapsedTime = TimeSpan.FromTicks(333333);
}


after writing above code, compile and run it. .and you will have your game starting in Portrait mode.

image

Friday, December 24, 2010

PuneUserGroup’s DevCon 2010

PUG DevCon 2010 was held on 18-19 December 2010 in ICC Towers, Pune. It was multi track event.

On 1st day we had 2 tracks. In 1st track, sessions were taken by Sanjay Vyaas, Nauzad Kapadia and Sarang Datye. In 2nd track, sessions were taken by Ashiwni Shahane, Saranya Sriram, Dhaval Faria and Ketaki Kode. Topics covered on 1st day were NET 4.0, multithreaded applications with Net 4.0, Office business applications, Azure applications, Cloud, XNA and Silverlight.

On 2nd day we had 3 tracks. 1st track included VS2010 sessions, 2nd track included Silverlight sessions and 3rd track included Sharepoint sessions. Sessions on 2nd day were taken by, Dhananjay Kumar, Subodh Sohoni, Gouri Sohoni, Kunal Chowdhary, Pradnya Naik, Nauzad Kapadia, Mahesh Sabnis, Mayur Tendulkar, Sudhendra Kohlam, Monish Darda, Raj Chaudhari, Sankool Shah and Dhaval Faria.

I was speaker for 1st day 2nd track. I spoke on Developing games using XNA game studio along with Dhaval Faria. I covered theory part of basics on building a game, previous video game consoles. Dhaval Faria covered the coding part for a game. Being a PUG volunteer, I also handled registration counter for both days.

Whole event was a big hit. Almost 140 people attended on Day 1 and 100 people attended on Day 2.

Thursday, November 25, 2010

Isolated Storage in Windows Phone 7

Hello.. I hope all are enjoying Windows Phone 7 development.. This is 1 more blog on Windows Phone 7. This blog is regarding isolated storage of Windows Phone 7. In this blog I am going to include a brief introduction on isolated storage of Windows Phone 7 and 1 demo along with its screenshots.

Isolated storage is basically local storage of your Windows Phone 7 mobile. Your applications can save its data in this isolated storage. It is compulsory for the user to save their application data in isolated storage. Windows Phone 7 does not allow storing files in any other file system locations.

Let’s see what exactly isolated storage means. “Isolated” means separated from others. So basically, in this storage each application’s data is isolated from each other. Means 1 application can’t see and access another application’s data. But sometimes it may happen that your 1 application may need data of another application. Then the best option is use of Cloud. You can put your data in cloud and access whichever data you want for any application.

It is very important that developer should keep a watch on data storage. It’s important that you should conserve data space. You can do this by deleting temporary data in storage. Also if user creates any data in the application, developer should allow them to delete it later which will help to conserve space. Using cloud as option is another way of conserving data space. Always give user, information about data getting stored in storage through your application so that if storage is getting full, user will get to know it and accordingly user can delete files.


The above figure is taken from msdn site. You can refer msdn site http://msdn.microsoft.com/en-us/library/ff402541%28v=VS.92%29.aspx for this. This figure shows you the actual storage of data. Figure is self-explanatory. Upper is the main Application Data Store Folder. It has two parts local settings and files and folders structure. 1st is Local Settings which updates the changes made by developer to the application directory. 2nd part is Files and Folders. You can access it by using API. Using these APIs developer can create, delete and manipulate files and folders.
Now let’s see demo for isolated storage.

Step 1:-

As we have to develop windows phone application, we need to choose Windows Phone application in Visual Studio. So it will be File -> New -> Project -> Windows Phone Application.


Once you create a new project you will get your project on your screen as shown in below figure.


Step 2:-

In this demo I am going to show you how to write and store data in isolated storage and also how to read data from isolated storage.
For that I am going to use 1 textbox to take input from user, 1 button to save data, 1 textblock to display stored data and again 1 button to retrieve data from isolated storage and display in above textblock. You can see this UI in figure below.


Step 3:-

Code behind..

As we have to use isolated storage, we need to add 2 IO namespaces.
System.IO
System.IO.IsolatedStorage
So at start you add these namespaces by including using statement in your code behind.


Step 4:-


Here we are going to include the steps for writing and reading data from isolated storage.

In the above figure you can see two methods written btnSave_Click and btnShow_Click. btnSave_Click is written for writing and storing data in isolated storage and btnShow_Clickis written for displaying data from isolated storage.
Let’s start with storing data. Here IsolatedStorageFile represents an isolated storage area containing files and folders. So basically using IsolatedStorageFile we can create directories, files etc were we can store our data. Later on we have created a directory called Data in storage. We can create files in this directory and store data in it. After that we going to use StreamWriter to write data in a file. So what we actually doing here is, 1st we creating a new IsolatedStorageFileStream for a file abc.txt in above created folder. Mode of this file is Create as we going to create this file in above created store (isf in our code). This whole argument is been given to StreamWriter. Later on we going to write in this file whatever input we had taken from the user. Thus we are done with writing data in file.

Now let’s see how to retrieve data. Here again we declaring new IsolatedStorageFile same way as above. Here as we have to read data we going to use StreamReader. So similarly, creating a new IsolatedStorageFileStream for a file abc.txt in above created folder. Mode of this file is Open as we going to open this file which was already created above in our store (isf in our code). This whole argument is been given to StreamReader. After this, we reading data from that file and displaying it in textblock. Thus we are done with reading data in file.

Step 5:-

Now let’s run our application by pressing F5. You will get on screen as shown in below figure.


This is going to be the UI which we had designed.

Now let’s enter input in textbox which will be stored in isolated storage.


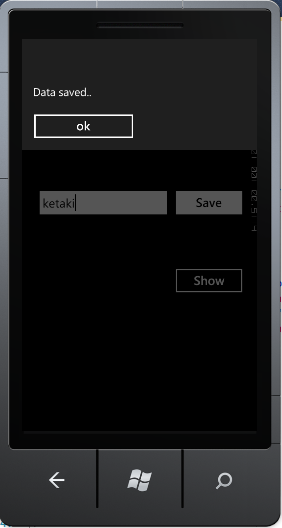
Once you click Save button your data gets saved in isolated storage and you get a message box that your data is stored.


Now let’s retrieve this stored data. Click on Show button and you will get the stored data in your textblock as shown in below figure.


That’s it!!! We are done with our isolated storage demo. Will be back soon with such more interesting blogs. Till that time, Good bye and enjoy WP7 developing.

Wednesday, November 17, 2010

Visual Studio Crash After Installing Windows Phone 7 SDK

After installing Windows Phone 7 SDK, when you start Visual Studio 2010 and Click on New Project or immediately after starting Visual Studio 2010, Visual Studio crash run following command in Visual Studio Command Prompt by going to Start > All Programs > Visual Studio 2010 > Visual Studio Tools > Visual Studio Command Prompt

devenv.exe /installvstemplates

Cause: if you run devenv.exe /Log C:\output.txt in your txt file you will notice that there are some duplicate entries for the Project Templates. By running above specified command it will reinstall VS Templates, and solve the issue.

Happy Windows Phone 7 Development :)

Monday, November 15, 2010

Submitting Windows Phone 7 Applications to MarketPlace

Hello.. We had seen how to develop an application for Windows Phone 7. We had seen a very basic application Hello World Application. We will see more later. This blog is for those who are ready with their applications or will be ready with their application. In my blog am going to explain the steps how you can submit your application on Marketplace.

So we have to start with creating an account. Once it’s done go to this site http://create.msdn.com/en-US/ . Login onto this site with username and password of the account created. Once you login you will get below image on your screen.


On left hand side you can see written Submit for Windows Phone. As the name suggests, if you want to submit your windows phone application you can click here for further procedure. Basically, this is a 5-step procedure which you have to complete for submitting your application on Marketplace.

1) Upload
2) Description
3) Artwork
4) Pricing
5) Submit

I will explain you these steps in detail once step by step. So back to Home page. When you will click on “Submit for Windows Phone”, you will a form of “upload” on your screen. You need to upload .xap file of your application. Now what is .xap file.

A .xap file is basically a compiled Silverlight application. The file is actually a .zip file that contains all the files necessary for the application. Just rename the .xap file to have a .zip extension and then you can open it up to see its contents. The .xap file contains an application manifest (AppManifest.xaml) file and all the necessary DLL's that are required by the application. This .xap file is placed in \Bin\Release or \Bin\Debug.

This .xap file to upload should not exceed than 400MB. In the form you can see, Application name. Give your application name. In Application Platform select Windows Phone 7. In language select English language. In version select the version which you have used. In Application Package upload your application. Below two are optional things. Once your upload form filling is done, click Next. It will take you to next step, “description”.


Above image shows how your description form will be. It consist complete description of your application. Depending on this form users will decide to buy your application or not as they will get complete description of your application. So I will suggest you to use many keywords so that it’s easy to for users to find your application. Now let’s see details about form. 1st is application title. You can write here according to your application. Similarly you can select category according to your application. Next is the detailed description. This is the main thing which user will go through. So write as much as possible. Next is optional part. Next field is keywords. Write as many keywords as I mentioned above. Legal URL field is optional. Then is Support Email Address. This field is also optional. But I will suggest you to add this email so that if any user has any issues or questions with your application he can mail you those solutions. So that once you solve those issues user will be satisfied completely. So it’s better to add Support Email Address. Required device capabilities field. This includes the requirements for your application.

Once your upload form filling is done, click Next. It will take you to next step, “artwork”.


Above image shows your artwork form. Artwork form includes tiles or images of your application. This will attract user to buy your application. Large mobile app tile and Small mobile app tile includes tiles of your application. Large has size of 173 X 173px and Small has 99 X 99px. Similarly size of Large PC app title is 200 X 200px. For creating this image you can use Paint.Net or Photoshop. Talking about images, you have to adjust your application image dimensions same like mentioned above. Even if it changes a bit, it will fail. Next field is Background art which is optional field. Next is screenshots. You can add screenshots of your application in this field. With these screenshots user will get proper idea about your application. You can add upto 8 screenshots. Its size is 480 X 800px.

Once your upload form filling is done, click Next. It will take you to next step, “pricing”.


Above image shows your pricing form. In this, 1st field is for trial mode. If your application has trial mode, tick this field. Next is worldwide distribution tick it as your application will be up for whole world. Primary offer currency, you can set this according to your convenience. You can set it as USD etc. Application Price is the price of your application. Set it as per your calculation. You can submit 5 free applications per account.

Once your upload form filling is done, click Next. It will take you to next step, “submit”.


This is the last form. There is only 1 option in this form. Automatically publish to Marketplace after passing certification. Tick this. Once you tick this click on button “Submit for certification” below.

So you are done with submitting your application in Marketplace. Once it’s done you can visit your app hub to see the status. Most of the Windows Phone 7 apps are being tested / approved within a few days. Its same as below image.


If your app fails testing, then Microsoft will send you an email detailing the reason for failure.

This is all with this blog. Will be back soon with few more blogs regarding Windows Phone 7!!! Till that time bye and enjoy development for Windows Phone 7.